
3-1/2 cups prepared or bottled pomegranate juice (about 5 large or 2 16-oz bottles)
6 Tbsp Ball® RealFruit® Classic Pectin
1/2 tsp butter or margarine, optional
5 cups sugar
6 (8 oz) half pint glass preserving jars with lids and bands
6 Tbsp Ball® RealFruit® Classic Pectin
1/2 tsp butter or margarine, optional
5 cups sugar
6 (8 oz) half pint glass preserving jars with lids and bands
…
Note: Wear rubber gloves to keep your hands from being stained.
We didn’t wear gloves and the poms didn’t stain our hands, but during the juicing process it definitely stained my shirt!
Juicing the Pomegranates

- Cut open the pom by removing the cap. Slice off the top as you would slicing off the top of a pumpkin for a jack-o-lantern. You must remove all of the seeds (arils) before juicing.
- Slice down each of the yellowish membrane sections. A pomegranate is split into sections, similar to an orange. Keep that in mind when slicing the fruit into sections along the membranes.
- Pull the sections apart like an orange and remove the arils. Drop the seeds into a bowl of cold water. This will make the extra membrane float which allows for further separation.

Drain the seeds by running the bowl through a colander.

Pick out any membrane that may have gotten caught with the seeds. You must remove all the membrane or the juice will be bitter.

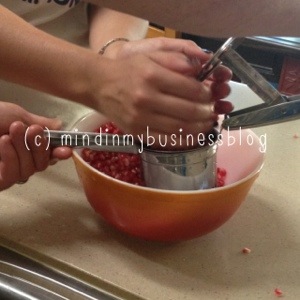
Pour the seeds into the ricer or into a fine sieve or cheesecloth to juice them.


Directions:
1.) PREPARE boiling water canner. Heat jars and lids in simmering water until ready for use. Do not boil. Set bands aside.
2.) PLACE pomegranate juice in a 6- or 8-quart saucepan. Gradually stir in pectin. Add up to 1/2 tsp butter or margarine to reduce foaming, if desired. Bring mixture to a full rolling boil that can not be stirred down, over high heat, stirring constantly.
3.) ADD entire measure of sugar, stirring to dissolve. Return mixture to a full rolling boil. Boil hard 1 minute, stirring constantly. Remove from heat. Skim foam if necessary.
We didn’t experience enough foaming to bother skimming it off, but batches vary and if there is foam be sure to skim it off the top.

4.) LADLE hot jelly into hot jars leaving 1/4 inch headspace. Wipe rim. Center lid on jar. Apply band until fit is fingertip tight.
Although the jelly was pipingy hot, it set up very quickly! Filling hot jars is critical. Make sure your jars stay hot by keeping them in the dishwasher until you are ready to use them.


5.) PROCESS in a boiling water canner for 10 minutes, adjusting for altitude. Remove jars and cool. Check lids for seal after 24 hours. Lid should not flex up and down when center is pressed.
We ended up with enough jelly for only five of the six jars. Hmm..maybe we were a little short on juice?! I can’t wait to spread some of this pom jelly on a slice of bread while sitting by the fire reading this winter!


Thanks Kenzie for helping us document the process by taking phenomenal pictures!
Thank you Gina & Hannah for the fresh poms!
Thank you Joe & Tracy for your help making the jelly and using your kitchen. You know I love to get messy in your kitchen 😉
More Ball canning recipes: http://www.freshpreserving.com/home.aspx

Great idea! Maybe I will get my non-fruit eating toddler to eat a superfood this way! Would love for you to let me know what you think of my recipes too x
thank you..will do